H2: Start With a Plan, Not a Shopping Cart
Building a gaming PC feels exciting, and it is easy to start by adding the most powerful parts you can find to a cart. A better first step is slower and cheaper in the long run: decide what you want to play, what screen you already own, and how much you are comfortable spending in total. A computer built for smooth play on a standard screen does not need the same parts as one built for a very large, high-refresh display, and buying parts without that picture often leads to a machine that is strong in one area and held back in another. Write down your budget, your must-have games or tasks, and whether you also want the PC for schoolwork, video editing, or streaming. That short list becomes a filter for every later choice, and it keeps the project focused when new releases and tempting upgrades appear. Understanding the tiny parts inside, starting with how microchips are made, also helps you see why compatibility matters more than any single headline feature.
H2: The Core Parts and What Each One Does
At the center of a gaming PC is the processor, which handles game logic, background tasks, and general responsiveness. The graphics card does the heavy visual work, drawing the worlds, characters, and effects you see on screen, and it usually has the largest effect on how smooth a game feels. Memory, often called RAM, gives the system fast working space for the game and programs that are currently open, while storage holds your games, files, and operating system when the computer is off. The motherboard connects everything and decides which parts can work together, the power supply delivers safe, steady electricity, and the case holds it all with room for air to move. A cooler keeps temperatures under control, because a hot computer can slow itself down to protect its parts. When these parts are balanced, no single component waits too long for another, and the whole system feels responsive. A quick look at emerging technologies shows how fast technology changes, which is why a balanced build usually ages better than a build that spends everything on one part.
H2: Compatibility Checks That Save Headaches
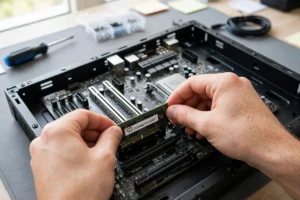
Most first-build problems are not caused by broken parts but by parts that do not quite fit together. Before you order, check that the processor matches the motherboard socket, that the memory type matches the motherboard, and that the graphics card physically fits inside the case with room for cables and airflow. Check that the power supply can comfortably handle the whole system, with some headroom left over, and that the case has the right mounts for your storage drives and cooler. It also helps to confirm how many fans the case supports and where air will enter and leave, because good airflow keeps temperatures lower and fans quieter. Reading guides like tips for discovering hidden tech gems and coolest gadgets of the year can help you compare cases, coolers, and other parts without relying only on advertising. If you are unsure about one combination, pause and check the manuals or a compatibility tool before ordering, since returning a part costs far more time than checking it twice.
H2: Building in a Sensible Order
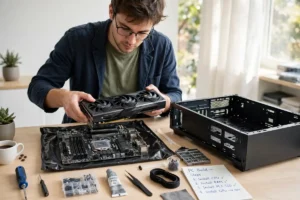
When the parts arrive, work on a clean, flat surface with good light, and keep screws and small parts in a small bowl so nothing rolls away. Many builders start by placing the processor, memory, and cooler onto the motherboard before it goes into the case, because there is more room to work and less chance of dropping something into a tight corner. Then the motherboard goes into the case, followed by storage drives, the power supply, and finally the graphics card, with cables routed neatly so they do not block fans. Take your time with each connector, and do not force anything that does not fit easily, since most PC connectors are shaped to fit only one way. Ground yourself by touching a metal part of the case from time to time, and keep drinks far from the work area. A calm, step-by-step build is usually faster than a rushed one, because it avoids the need to take everything apart again to find a loose cable.
H2: First Boot, Software, and Updates
The first time you press the power button, do not worry if the screen takes a moment to appear. Check that fans are spinning, lights are on, and the display cable is plugged into the graphics card rather than the motherboard when a separate graphics card is installed. If nothing appears, the most common causes are a loose power cable, a memory stick that is not fully seated, or a display cable in the wrong port, and each is easy to check. Once the system starts, install the operating system, then update the drivers for the graphics card and motherboard, since updated drivers often fix bugs and improve game performance. A reliable connection matters here too, and how the internet works and how Wi-Fi works explain the networks that carry those large downloads. After updates, install one game first and test it before adding everything else, so any problem is easier to trace.
Common Beginner Mistakes to Avoid
Beginners often forget to remove protective covers, leave a power cable unplugged, or install memory in the wrong slots, and all of these are easy to fix once you know to look for them. Another common mistake is closing the case before testing, which makes it harder to reach a loose cable. It also helps to keep the manuals and boxes until the system has run well for a week, in case a part needs to be exchanged. As with other modern devices, from connected devices to how noise-cancelling headphones work, the setup guides and software updates matter as much as the hardware itself. Taking notes about which cable went where can save time later if you upgrade a drive or add memory.
H2: Testing, Upgrading, and Enjoying Your Build
After the first successful week, pay attention to temperatures, fan noise, and game smoothness rather than chasing numbers for their own sake. If games run smoothly and the computer stays reasonably cool and quiet, the build is doing its job. Later upgrades are easiest when you planned for them: extra memory slots, spare storage mounts, and a power supply with headroom all make future improvements simpler. Even quantum computing explained and software development trends are reminders that computing keeps moving, so a PC that is easy to open and upgrade will serve you longer than one packed so tightly that nothing can change. Building your own gaming PC is satisfying because you understand every part inside it, and that understanding makes every future fix or upgrade feel far less intimidating.
H2: Budgeting Without Regret
A gaming PC budget works best when it includes everything, not just the main parts. Remember the operating system if you need one, a monitor if your current screen is very old, and small items like extra cables, thermal paste if your cooler needs it, and a surge-protected power strip. It is easy to spend the whole budget on a graphics card and then discover there is nothing left for storage or a decent case with good airflow. A balanced plan leaves a small reserve for a part that needs exchanging or a tool you forgot. That reserve feels unnecessary until you need it, and then it feels like the smartest part of the whole build. Spending a little less on one headline part to get a reliable power supply and good cooling is usually a trade worth making.
H2: What to Do If Something Goes Wrong
If your new PC does not start, work through the simplest checks first before assuming a part is faulty. Confirm the power switch on the power supply is on, the main power cable is fully seated, and the front-panel connectors are in the right place. Reseat the memory, check the graphics card power cables, and try one memory stick at a time if you have more than one. If the system starts but a drive is missing, check its power and data cables. Keep notes about what you tried, because that record helps if you need to ask for help or exchange a part. Most first-build problems have simple causes, and a patient, step-by-step check usually finds them faster than taking the whole machine apart at once.
H2: Keeping Your Build Healthy
Once your PC is running well, simple care keeps it that way. Keep the case in a spot with room for air to flow, clean dust filters gently when they look dusty, and keep drinks away from the desk. Update drivers and system software regularly, but avoid changing several things at once, so you can tell what caused any new problem. Back up important files, especially game saves and school or work documents, to a second drive or cloud service. A gaming PC is a long-term companion when it is cared for, and the understanding you gained by building it makes every future upgrade, cleaning, or repair feel manageable rather than mysterious.